
I am asking lacemakers to help build the knowledge base for Thread Testing for Lace Making. The goal of this book is to create a practical reference with a variety of lace grids. By contributing small samples of thread, you are helping to create a shared resource that reflects how thread is used in practice.
Thread Due Date
Please mail your thread donation by June 1, 2026.
What I Am Looking For
I am collecting labeled thread samples with complete information to be worked and included in the reference section of the book.
Please include:
– Brand
– Thread size
– Fiber type
– The type of lace that you would use the thread (Torchon, Bucks, Flanders, Chantilly, etc.)
If you use the same thread for more than one type of lace, please write that as well.
Because this book is intended to be a reliable reference, I can only accept thread samples with complete and accurate labeling.
Examples of thread information:
– DMC Retors d’Alsace 30, Cotton, Torchon. I bought this thread to use with a pattern from the Torchon Lacemaking book by Wade.
– Madeira tanne 50, Cotton, Bucks?
– Linen 40/3, Torchon
How Much Thread to Send
For consistency, I’m asking for a standard amount of thread. Some grids need less, but using a single standard amount ensures the sample works across all lace types and thread weights.
These measurements are roughly the same. Please use the one that is most familiar to you.
To test the thread, I need approximately:
– 30 feet
– 10 yards
– 9 meters
Sending more than this amount is fine. Extra threads can be used with multiple grids, so nothing will be wasted.
White thread is preferred for all (black thread for Chantilly), but I will happily take any color you have.
How Your Thread Will Be Used
Each thread donation will be tested on a graduated grid chosen to match the type of lace you noted.
The tester grids are designed to work up quickly. This allows each thread to be tested efficiently and consistently without unnecessary use of material.
The results will be photographed and included for reference.
Preparing Your Thread

Please, wind the thread onto a cardstock or cardboard thread holder. Store-bought or handmade is fine.
See the instructions and images below, for making a simple cardstock or cardboard thread holder.
Number the thread holder and provide details in a letter. Also, include your contact info and any additional details you’d like to share about the thread and how you use it.

Be sure the thread is clearly labeled and the required information is included.
A Note of Thanks
Every lacemaker who contributes thread will be acknowledged by name in Thread Testing for Lace Makers. Your contribution directly supports this project, and it is important to me to recognize that.
Where to Send Your Thread
Cajah Reed
8275 E 11th Ave #200961
Denver, CO 80220
Why This Matters
This book is about giving lacemakers the information they need to make confident choices. Thread behaves differently depending on scale, grid, and type of lace. By contributing thread samples, you are helping build a reference grounded in actual materials and real practice.
Thank you for being part of this work.
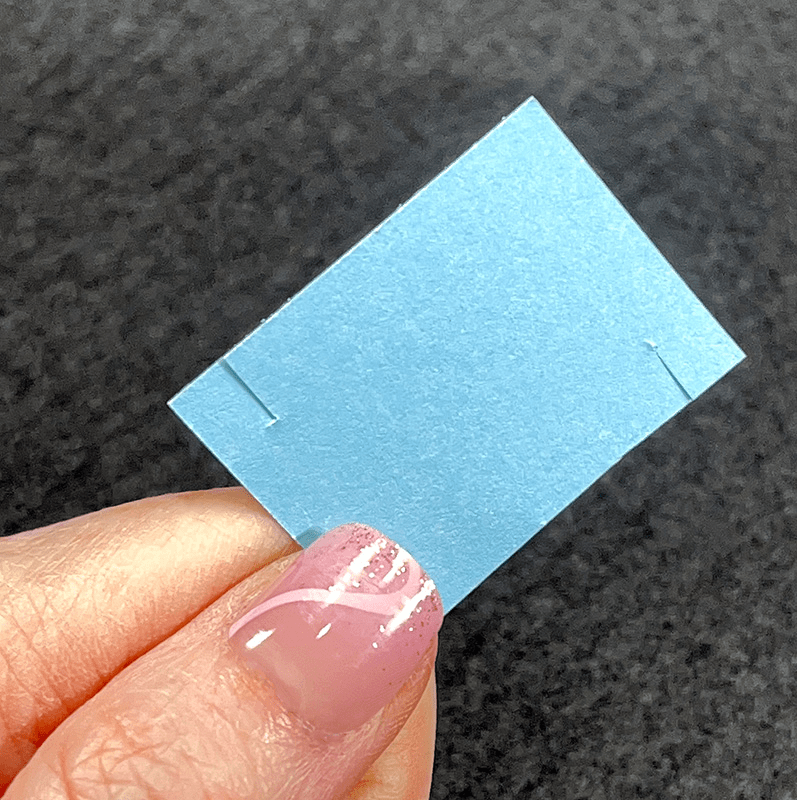
Making a Cardstock Thread Holder

Step 1 – Use a piece of cardstock that is thicker than regular printer paper.
The example is 1 inch (2.5 cm) by 1.5 inches (4 cm). This works for thinner thread, but a thicker thread may need a larger rectangle. Make the thread holder the size you feel is right for the thread you are donating.

Step 2 – Cut a small slit on opposite sides of the cardstock.
Step 3 – When winding thread, place the beginning of your thread in one slit and then end in the other.
Making a Cardboard Thread Holder

Step 1 – Save a toilet paper or paper towel tube.

Step 2 – Cut the tube open.

Step 3 – Cut a section off the end of the flattened tube.

Step 4 – Make the thread holder the size you feel is right for the thread you are donating. I used 1 inch (2.5 cm) by 1.5 inches (4 cm) for thin thread.

Step 5 – Cut a small slit on opposite sides of the cardstock.

Step 6 – When winding thread, place the beginning of your thread in one slit and then end in the other.